저희 웹어플리케이션은 사람들 간의 관계 형성을 목적으로 하므로, 사용자는 상대방이 실제 본인임을 믿고 대화하거나 만남을 이어나가야 합니다. 본인인증을 통해 사용자는 상대방의 신뢰성을 확인할 수 있으며, 이를 통해 가짜 계정이나 사기 행위로 인한 위험을 줄일 수 있습니다.
따라서 저는 본인인증로직을 사용자의 이메일로 인증 코드를 보내고, 해당 코드를 모달 창을 통해 입력받아야만 회원가입이 완료되도록 구현하였습니다. 래는 이를 구현하기 위한 전체적인 로직을 설명하겠습니다.
// Spring Boot Mail (JavaMailSender 사용)
implementation 'org.springframework.boot:spring-boot-starter-mail'
먼저 buildgradle에 의존성을 추가해 줍니다.
그 뒤 application properties를 통해 관련 설정을 해줍니다.
spring.mail.host=smtp.gmail.com
spring.mail.port=587
spring.mail.username=
spring.mail.password=
spring.mail.properties.mail.smtp.auth=true
spring.mail.properties.mail.smtp.starttls.enable=true
spring.mail.properties.mail.smtp.starttls.required=true
spring.mail.properties.mail.smtp.connectiontimeout=5000
spring.mail.properties.mail.smtp.timeout=5000
spring.mail.properties.mail.smtp.writetimeout=5000
그 다음에 html파일을 통해 인증코드를 받아 줄 모달창, 이메일을 보내고 확인 해 줄 ajax비동기 통신 그리고 유효성검사를 구현을 해 줍니다.
<!-- 인증 코드 입력 모달 -->
<div id="verificationModal" class="modal">
  <div class="modal-content">
    <div class="modal-header">인증 코드 입력</div>
    <div class="modal-body">
      <label for="verificationCode">인증 코드</label>
      <input type="text" id="verificationCode" placeholder="인증 코드를 입력하세요">
    </div>
    <div class="modal-footer">
      <button class="modal-save-button" onclick="verifyCode()">확인</button>
    </div>
  </div>
</div>
let isEmailVerified = false;  // 이메일 인증 상태

// 이메일 인증 코드 전송
  function sendVerificationCode() {
    const email = document.getElementById('email').value;

    fetch(`/send-verification-code?email=${encodeURIComponent(email)}`, {
      method: 'GET',
    })
            .then(response => response.json())
            .then(data => {
              if (data.success) {
                alert('인증 코드가 이메일로 전송되었습니다. 이메일을 확인하세요.');
                document.getElementById('verificationModal').style.display = 'block'; // 모달 표시
              } else {
                alert('인증 코드를 전송하는 중 오류가 발생했습니다.');
              }
            })
            .catch(error => {
              console.error('Error:', error);
              alert('오류가 발생했습니다.');
            });
  }

  // 인증 코드 확인
  function verifyCode() {
    const email = document.getElementById('email').value;
    const code = document.getElementById('verificationCode').value;

    fetch(`/verify-code?email=${encodeURIComponent(email)}&code=${encodeURIComponent(code)}`, {
      method: 'GET',
    })
            .then(response => response.json())
            .then(data => {
              if (data.verified) {
                alert('이메일 인증이 완료되었습니다.');
                isEmailVerified = true; // 인증 완료
                document.getElementById('verificationModal').style.display = 'none'; // 모달 숨김
              } else {
                alert('인증 코드가 잘못되었습니다.');
              }
            })
            .catch(error => {
              console.error('Error:', error);
              alert('오류가 발생했습니다.');
            });
  }


  function validateForm() {
       if (!isEmailVerified) {
      alert('이메일 인증이 완료되어야 회원가입을 진행할 수 있습니다.');
      return false;
    }
데이터베이스에는 VerificationCode라는 테이블을 만들어 이메일 인증 코드를 저장하고 검증할 수 있도록 설정해 줍니다.
public class VerificationCode {

    @Id
    @GeneratedValue(strategy = GenerationType.IDENTITY)
    private Long id;

    private String email;
    private String code;

    public VerificationCode(String email, String code) {
        this.email = email;
        this.code = code;
    }

    // Getters and setters 생략
}
repository또한 구현을 해서 데이터베이스와 매핑 할 수 있게 해줍니다.
public interface VerificationCodeRepository extends JpaRepository<VerificationCode, Long> {
    // 이메일과 인증 코드를 이용해 VerificationCode 조회
    Optional<VerificationCode> findByEmailAndCode(String email, String code);

    // 이메일을 기반으로 인증 코드 삭제
    void deleteByEmail(String email);
}
그 뒤 이메일을 전송, 코드 저장 및 조회, 이메일 확인에 관련된 서비스 로직을 작성을 해줍니다.
@Service
@RequiredArgsConstructor
public class EmailService {

    private final JavaMailSender mailSender;
    private final VerificationCodeRepository verificationCodeRepository;

    public void sendVerificationEmail(String to, String subject, String content) throws MessagingException {
        MimeMessage message = mailSender.createMimeMessage();
        MimeMessageHelper helper = new MimeMessageHelper(message, true);

        helper.setTo(to);
        helper.setSubject(subject);
        helper.setText(content, true); // HTML로 이메일을 전송하기 위해 true 설정

        mailSender.send(message); // 이메일 전송
    }

    // 이메일로 인증 코드를 저장하는 메서드
    public void saveVerificationCode(String email, String code) {
        VerificationCode verificationCode = new VerificationCode(email, code);
        verificationCodeRepository.save(verificationCode);
    }

    // 인증 코드 확인 메서드
    public boolean verifyCode(String email, String code) {
        Optional<VerificationCode> optionalCode = verificationCodeRepository.findByEmailAndCode(email, code);
        if (optionalCode.isPresent()) {
            verificationCodeRepository.delete(optionalCode.get()); // 인증 완료 후 코드 삭제
            return true;
        }
        return false;
    }
그 뒤 클라이언트로 부터 비동기 통신을 통해 데이터를 받아 서비스 로직을 실행시키고 결과값을 반환 해 줄 컨트롤러를 작성해 줍니다.
// 이메일 인증 코드 전송 API
@GetMapping("/send-verification-code")
public ResponseEntity<Map<String, Boolean>> sendVerificationCode(@RequestParam String email) {
Map<String, Boolean> response = new HashMap<>();
// 인증 코드 생성
String verificationCode = UUID.randomUUID().toString().substring(0, 6); // 6자리 인증 코드
emailService.saveVerificationCode(email, verificationCode);
// 인증 코드 이메일로 전송
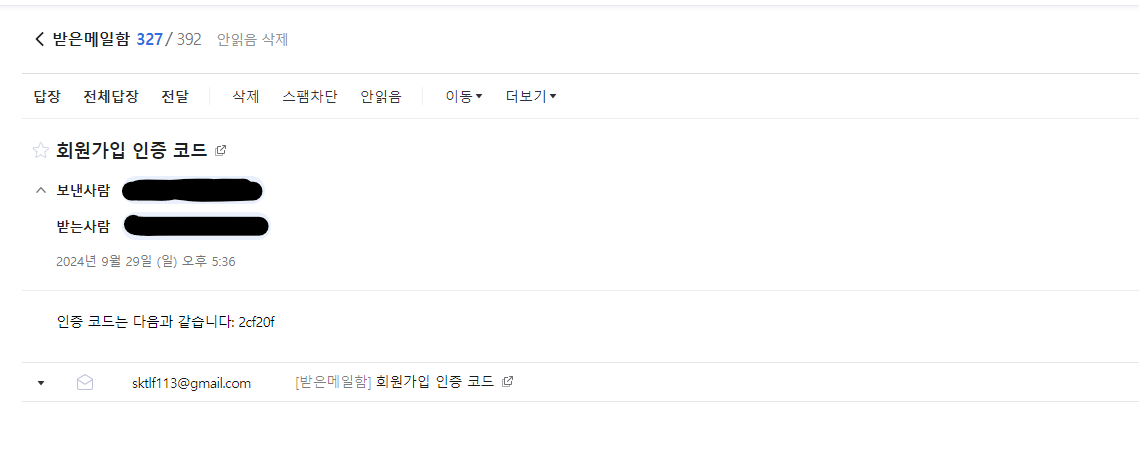
String subject = "회원가입 인증 코드";
String content = "인증 코드는 다음과 같습니다: " + verificationCode;
try {
emailService.sendVerificationEmail(email, subject, content);
response.put("success", true);
} catch (Exception e) {
response.put("success", false);
}
return ResponseEntity.ok(response);
}
// 이메일 인증 코드 확인 API
@GetMapping("/verify-code")
public ResponseEntity<Map<String, Boolean>> verifyCode(@RequestParam String email, @RequestParam String code) {
Map<String, Boolean> response = new HashMap<>();
boolean isVerified = emailService.verifyCode(email, code);
response.put("verified", isVerified);
return ResponseEntity.ok(response);
}
url에 대한 인증되지 않은 접근이 차단되는 것을 막기 위해 스프링 시큐리티 설정도 해줍니다.
@Bean
public SecurityFilterChain filterChain(HttpSecurity http) throws Exception {
    return http
            .authorizeRequests()
            .requestMatchers("/login", "/signup", "/user","image/*","/check-username","/send-verification-code","/verify-code").permitAll()
            .anyRequest().authenticated()
            .and()
            .formLogin()
            .loginPage("/login")
            .defaultSuccessUrl("/articles")
            .and()
            .logout()
            .logoutSuccessUrl("/login")
            .invalidateHttpSession(true)
            .and()
            .csrf().disable()
            .build();
}
이렇게 하면 이메일을 통해 본인인증을 받고 본인인증 코드를 입력해야만 회원가입이 처리 될 수 있도록 구현할 수 있습니다.
'project > 모임웹프로젝트' 카테고리의 다른 글
| 로그인 기능 구현 중 UserDetails 관련 이슈 (10) (2) | 2024.09.30 |
|---|---|
| 모임 웹프로젝트 로그인 기능 구현(9) (1) | 2024.09.30 |
| 모임 웹 프로젝트 회원가입 아이디 중복검사 처리(7) (0) | 2024.09.29 |
| 모임 웹 프로젝트 회원가입 백엔드 구성 (6) (0) | 2024.09.29 |
| 모임 웹 프로젝트 회원가입 코드수정 (5) (0) | 2024.09.29 |