아이디 비밀번호 찾기를 구현하겠습니다.
아이디는 이름과 이메일을 받아서 일치하면 아이디 값을 반환하고 비밀번호는 이메일을 통해 본인인증을 한 뒤 재설정을 할 수 있게 설정하였습니다.
먼저 프런트 부분입니다.
<div class="form-group-find">
  <div class="find-id-password"><a href="#" onclick="showFindUsernamePopup()">아이디 찾기</a></div>
  <p style="margin: -5px">/</p>
  <div class="find-id-password"><a href="#" onclick="showRecoveryPopup()">비밀번호 찾기</a></div>
</div>
아이디 찾기와 비밀번호 찾기에 onclick 이벤트를 설정해 준뒤
<!-- 팝업 배경 -->
<div id="popupBackground" class="popup-background hidden"></div>

<!-- 비밀번호 찾기 팝업 -->
<div id="popupRecoveryForm" class="popup-form hidden">
  <div class="popup-header">
    <h2>비밀번호 찾기</h2>
    <button class="close-popup" onclick="closeRecoveryPopup()">X</button>
  </div>
  <form id="recoveryForm">
    <div class="form-group">
      <label for="email">이메일을 입력하세요:</label>
      <input type="email" class="form-control" id="email" name="email" placeholder="이메일" required>
    </div>
    <button type="button" class="send-code-button" onclick="sendRecoveryCode()">인증 코드 전송</button>

    <div id="codeVerification" class="hidden">
      <div class="form-group">
        <label for="code">인증 코드를 입력하세요:</label>
        <input type="text" class="form-control" id="code" name="code" placeholder="인증 코드" required>
      </div>
      <button type="button" class="verify-code-button" onclick="verifyRecoveryCode()">인증 코드 확인</button>
    </div>

    <div id="recoveryOptions" class="hidden">
      <h3>비밀번호 재설정</h3>
      <div id="usernameDisplay"></div>
      <div id="passwordReset" class="hidden" style="margin-bottom: 15px">
        <label for="newPassword"  style="margin-bottom: 10px">새 비밀번호:</label>
        <input type="password" class="form-control" id="newPassword" name="newPassword" placeholder="새 비밀번호">
        <button type="button" class="reset-password-button" onclick="resetPassword()">비밀번호 재설정</button>
      </div>
    </div>
  </form>
</div>

<!-- 아이디 찾기 폼 -->
<div id="popupFindUsername" class="popup-form hidden">
  <div class="popup-header">
    <h2>아이디 찾기</h2>
    <button class="close-popup" onclick="closeFindUsernamePopup()">X</button>
  </div>
  <form id="findUsernameForm">
    <div class="form-group">
      <label for="name">이름</label>
      <input type="text" class="form-control" id="name" name="name" placeholder="이름" required>
    </div>
    <div class="form-group">
      <label for="email">이메일</label>
      <input type="email" class="form-control" id="useremail" name="email" placeholder="이메일" required>
    </div>
    <button type="button" class="send-find-username-button" onclick="findUsername()">아이디 찾기</button>

    <!-- 아이디 찾기 결과 -->
    <div id="usernameResult" class="hidden">
      <h3>아이디: <span id="useridDisplay"></span></h3>
      <div style="margin: 0 auto; margin-top: 20px"><a href="#" class="find-password-button" onclick="showRecoveryPopup(),closeFindUsernamePopup()">비밀번호 찾기</a></div>
    </div>
  </form>
</div>
온클릭 이벤트가 실행 되면 화면에 띄어질 팝업창을 만들어 줍니다.
그 뒤
// 팝업 열기
function showRecoveryPopup() {
    document.getElementById('popupRecoveryForm').classList.remove('hidden');
    document.getElementById('popupBackground').classList.remove('hidden');
}

// 팝업 닫기
function closeRecoveryPopup() {
    document.getElementById('popupRecoveryForm').classList.add('hidden');
    document.getElementById('popupBackground').classList.add('hidden');
    document.getElementById('codeVerification').classList.add('hidden'); // 인증 코드 입력 폼 숨김
    document.getElementById('passwordReset').classList.add('hidden'); // 비밀번호 재설정 폼 숨김
}

// 인증 코드 전송
function sendRecoveryCode() {
    const email = document.getElementById('email').value;

    fetch(`/send-recovery-code?email=${email}`)
        .then(response => response.json())
        .then(data => {
            if (data.success) {
                alert('인증 코드가 전송되었습니다. 이메일을 확인하세요.');
                document.getElementById('codeVerification').classList.remove('hidden');
            } else {
                alert('인증 코드 전송에 실패했습니다. 다시 시도해주세요.');
            }
        });
}

// 인증 코드 확인
function verifyRecoveryCode() {
    const email = document.getElementById('email').value;
    const code = document.getElementById('code').value;

    fetch(`/verify-recovery-code?email=${email}&code=${code}`)
        .then(response => response.json())
        .then(data => {
            if (data.verified) {
                alert('인증 성공!');
                document.getElementById('recoveryOptions').classList.remove('hidden'); // 아이디 찾기 및 비밀번호 재설정 옵션 표시
                document.getElementById('passwordReset').classList.remove('hidden'); // 비밀번호 재설정 폼 표시
            } else {
                alert('인증 코드가 일치하지 않습니다.');
            }
        });
}

// 비밀번호 재설정
function resetPassword() {
    const email = document.getElementById('email').value;
    const newPassword = document.getElementById('newPassword').value;

    fetch(`/recover-id-password`, {
        method: 'POST',
        headers: {
            'Content-Type': 'application/json',
        },
        body: JSON.stringify({
            email: email,
            password: newPassword
        })
    })
        .then(response => response.json())
        .then(data => {
            if (data.message) {
                alert(data.message);

                // 비밀번호 재설정 성공 시 팝업창 닫기
                if (data.message === "비밀번호가 성공적으로 재설정되었습니다.") {
                    closeRecoveryPopup(); // 팝업창 닫기
                }
            }
        });
}

// 아이디 찾기
function findUsername() {
    const name = document.getElementById('name').value;
    const email = document.getElementById('useremail').value;

    fetch(`/find-username`, {
        method: 'POST',
        headers: {
            'Content-Type': 'application/json',
        },
        body: JSON.stringify({ name: name, email: email })
    })
        .then(response => response.json())
        .then(data => {
            if (data.uid) {
                document.getElementById('useridDisplay').textContent = data.uid;
                document.getElementById('usernameResult').classList.remove('hidden');
            } else {
                alert('이름과 이메일이 일치하는 사용자를 찾을 수 없습니다.');
            }
        });
}

// 아이디 찾기 팝업 열기
function showFindUsernamePopup() {
    document.getElementById('popupFindUsername').classList.remove('hidden');
    document.getElementById('popupBackground').classList.remove('hidden');
}

// 아이디 찾기 팝업 닫기
function closeFindUsernamePopup() {
    document.getElementById('popupFindUsername').classList.add('hidden');
    document.getElementById('popupBackground').classList.add('hidden');
}
스크립트에 fetch함수를 통해서 비동기방식으로 클라이언트 요청을 할 수 있게 처리합니다.
이렇게 프런트 부분을 구성해 준뒤 이제 서버 로직 구성을 하겠습니다.
먼저 아이디 찾기 부분 입니다.
Optional<User> findByNameAndEmail(String name, String email);
repository에 이름과 이메일을 통해 아이디를 찾을 수 있는 메서드를 구성 해 줍니다.
그리고 나서
 @PostMapping("/find-username")
    public ResponseEntity<Map<String, Object>> findUsername(@RequestBody Map<String, String> requestData) {
        Map<String, Object> response = new HashMap<>();

        String email = requestData.get("email");
        String name = requestData.get("name");

        // 이름과 이메일로 유저 찾기 로직
        Optional<User> optionalUser = userRepository.findByNameAndEmail(name, email);
        if (optionalUser.isPresent()) {
            // 아이디 반환
            response.put("uid", optionalUser.get().getUid());
        } else {
            response.put("message", "해당 정보로 등록된 사용자가 없습니다.");
        }

        return ResponseEntity.ok(response);
    }
}
컨트롤러를 통해서 아이디와 비밀번호를 찾을 수 있는 메서드를 구성해 줍니다.
여기서 주의 해야 할 점은 uid값을 아이디로 이용하고 있기 때문에 uid값을 반환 받도록 설정을 해야 합니다.(username이나 email과 햇갈릴 수도 있음)
그 다음에 비밀번호 찾기 로직 구성입니다.
일단 이전에 이메일을 통한 본인인증 과정에서 구성했던 emailservice로직을 그대로 사용해 줍니다.
package org.zerock.wantuproject.service;

import jakarta.mail.MessagingException;
import jakarta.mail.internet.MimeMessage;
import lombok.RequiredArgsConstructor;
import org.springframework.mail.javamail.JavaMailSender;
import org.springframework.mail.javamail.MimeMessageHelper;
import org.springframework.stereotype.Service;
import org.zerock.wantuproject.entity.VerificationCode;
import org.zerock.wantuproject.repository.VerificationCodeRepository;

import java.util.Optional;


@Service
@RequiredArgsConstructor
public class EmailService {

    private final JavaMailSender mailSender;
    private final VerificationCodeRepository verificationCodeRepository;

    public void sendVerificationEmail(String to, String subject, String content) throws MessagingException {
        MimeMessage message = mailSender.createMimeMessage();
        MimeMessageHelper helper = new MimeMessageHelper(message, true);

        helper.setTo(to);
        helper.setSubject(subject);
        helper.setText(content, true); // HTML로 이메일을 전송하기 위해 true 설정

        mailSender.send(message); // 이메일 전송
    }

    // 이메일로 인증 코드를 저장하는 메서드
    public void saveVerificationCode(String email, String code) {
        VerificationCode verificationCode = new VerificationCode(email, code);
        verificationCodeRepository.save(verificationCode);
    }

    // 인증 코드 확인 메서드
    public boolean verifyCode(String email, String code) {
        Optional<VerificationCode> optionalCode = verificationCodeRepository.findByEmailAndCode(email, code);
        if (optionalCode.isPresent()) {
            verificationCodeRepository.delete(optionalCode.get()); // 인증 완료 후 코드 삭제
            return true;
        }
        return false;
    }
}
그 뒤에 컨트롤러 구성을 해줍니다.
// 이메일로 아이디/비밀번호 찾기 요청 API
@GetMapping("/send-recovery-code")
public ResponseEntity<Map<String, Boolean>> sendRecoveryCode(@RequestParam String email) {
    Map<String, Boolean> response = new HashMap<>();

    // 인증 코드 생성
    String verificationCode = UUID.randomUUID().toString().substring(0, 6); // 6자리 인증 코드 생성
    emailService.saveVerificationCode(email, verificationCode);

    // 인증 코드 이메일로 전송
    String subject = "아이디/비밀번호 찾기 인증 코드";
    String content = "인증 코드는 다음과 같습니다: " + verificationCode;
    try {
        emailService.sendVerificationEmail(email, subject, content);
        response.put("success", true);
    } catch (Exception e) {
        response.put("success", false);
    }

    return ResponseEntity.ok(response);
}

// 이메일 인증 코드 확인 API
@GetMapping("/verify-recovery-code")
public ResponseEntity<Map<String, Boolean>> verifyRecoveryCode(@RequestParam String email, @RequestParam String code) {
    Map<String, Boolean> response = new HashMap<>();

    boolean isVerified = emailService.verifyCode(email, code);
    response.put("verified", isVerified);

    return ResponseEntity.ok(response);
}

// 비밀번호 재설정 또는 아이디 찾기 완료 API
@PostMapping("/recover-id-password")
public ResponseEntity<Map<String, Object>> recoverIdOrPassword(@RequestBody AddUserRequest userRequest) {
    Map<String, Object> response = new HashMap<>();

    // 이메일로 아이디 찾기 로직
    Optional<User> optionalUser = userRepository.findByEmail(userRequest.getEmail());
    if (optionalUser.isPresent()) {
        if (userRequest.getPassword() != null) {
            // 비밀번호 재설정 로직
            User user = optionalUser.get();
            user.setPassword(bCryptPasswordEncoder.encode(userRequest.getPassword()));
            userRepository.save(user);
            response.put("message", "비밀번호가 성공적으로 재설정되었습니다.");
        } else {
            // 아이디 반환
            response.put("username", optionalUser.get().getUsername());
        }
    } else {
        response.put("message", "해당 이메일로 등록된 사용자가 없습니다.");
    }

    return ResponseEntity.ok(response);
}
인증코드를 전송해주는 메서드와 이메일 인증코드를 확인해주는 메서드 그리고 비밀번호를 재설정 해주는메서드를 모두 구현을 해줍니다.
이렇게 하면 비밀번호 찾기 아이디 찾기 로직을 구성 할 수 있습니다.
그리고 스프링 시큐리티를 이용할때 인증 받지 않는 사용자가 이용하는 페이지나 url은 꼭 스프링 시큐리티에 permitAll처리를 해주어야 합니다.
.authorizeRequests()
.requestMatchers("/login", "/signup", "/user","image/*","/check-username","/send-verification-code","/verify-code",
        "/css/**", "/image/**", "/js/**","/","/main",
        "/send-recovery-code","/verify-recovery-code","/recover-id-password","/find-username").permitAll()
.anyRequest().authenticated()
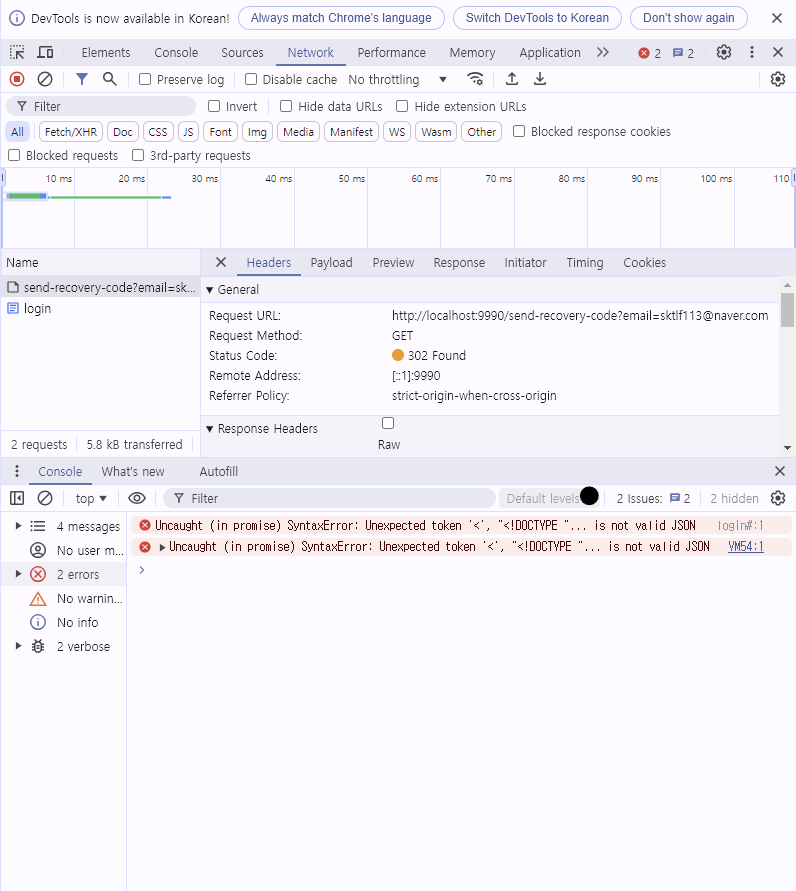
만약 permitAll을 처리하지 않으면 json형식으로 반환 받기 위해 보낸 요청이 json 형식이 아니라 에러페이지를 반환해
밑에 사진처럼 Json반환을 받지 못했다는 오류 메세지를 받을 수 있습니다.
이렇게 아이디 비밀번호 찾기 로직을 구현해 보았습니다.
'project > 모임웹프로젝트' 카테고리의 다른 글
| 모임 웹프로젝트 실시간 채팅 프런트 구성 (0) | 2024.11.19 |
|---|---|
| 메인페이지 구성 (0) | 2024.11.18 |
| 로그인 기능 구현 중 UserDetails 관련 이슈 (10) (2) | 2024.09.30 |
| 모임 웹프로젝트 로그인 기능 구현(9) (1) | 2024.09.30 |
| 모임 웹 프로젝트 회원가입 중복확인 (8) (0) | 2024.09.29 |